
Figure 1. A solid manure spreader truck making a calibration run. Image credit: Cassie LeMaster, Clemson University.
Animal manure contains nutrients required for plant growth and has been utilized as a fertilizer source for millennia. Efficient utilization of animal manure requires (1) a manure nutrient analysis to determine the nutrient levels in the manure, and (2) application at the correct rate based on the manure analysis to provide the nutrients required by the crop. Simply estimating the amount of manure applied and the area the manure is applied to can easily result in under-application of necessary nutrients, resulting in poor crop yields; or over-application of the same, resulting in waste of nutrients, possible surface or groundwater quality impacts, and in some cases, nutrient imbalances that may negatively impact crop yields. Manure spreader calibration (figure 1) is essential for maximum profitability and environmental protection.
Manure Analysis
A manure nutrient analysis may be obtained from the Clemson Agricultural Service Laboratory. The laboratory will analyze manure samples for primary and secondary nutrients as well as many micronutrients. Manure samples should be refrigerated until they are shipped to the laboratory to help prevent manure nutrient degradation due to microbial activity. One quart of manure placed in a sealed household freezer bag is required to complete the analysis, which currently costs $33.
The manure analysis results and a current soil test should be used to determine the target manure application rate for each field. A current soil test will provide the nutrient levels in the field and the amount of nutrients needed for the crop to be grown. More information on this procedure may be found in chapters 5 and 6 of the South Carolina Confined Animal Manure Manager (CAMM) manuals.1
There are two commonly used methods of solid manure spreader calibration – the Container Method and the Sheet Method. Both methods use similar procedures and are presented in this publication.
Solid Manure Spreader Calibration – The Container Method
A worksheet for the Container Method is included in the PDF download for this entire publication (see link at top of page) or a PDF download for the worksheet only is also available. The container method requires five to seven equally sized containers (shoebox-sized plastic containers work well), a tape measure, and a postal scale. The scale must be an accurate scale, such as a postal scale, since the collected manure must be weighed to the nearest tenth of a pound (or ounce) for an accurate measurement. An example calibration calculation is included in the steps below for better understanding.
Step 1. Weigh the Containers
Weigh all of the containers to be used while empty, before they are used, with the postal scale. The containers do not need to be weighed individually but may be weighed together if the combined weight does not exceed the scale capacity – a total empty container weight is the number needed. If the weight is provided in pounds and ounces by the scale, divide the ounces by 16 to get a decimal number. Record this weight.
Example: 7 containers were used, with a total weight of 5 pounds, 4.8 ounces. Divide 4.8 ounces by 16 to get (4.8 / 16 =) 0.3 pounds, so the total weight is 5.3 pounds.
Step 2. Determine the Spreading Width

Figure 2. A typical container layout to determine spreading width. Image credit: W. Bryan Smith, Clemson University.
Determine the normal spreading width of the manure spreader. This will vary depending on the moisture content of the manure to be spread, the type of spreader used, and the gate and spinner settings of the spreader. One method to determine this is to place a number of containers across the field on a regular spacing, wide enough to allow two “normal” passes of the manure spreader (figure 2). Make two passes in the same direction, then visually inspect the amount of manure captured in each container. If the containers between the two passes seem to have captured little manure when compared to those in the spreader’s direct path, the spreading width is too wide. If those same containers seem to contain considerably more manure than those in the spreader’s direct path, the spreading width is too narrow. A few passes will help determine the most uniform spreading width in short order.
Step 3. Place Containers
Place the containers in a line across the pathway of the planned track of the spreader (figures 3 and 4) for a single-pass calibration (a two-pass calibration layout similar to figure 2 may be more accurate – see Note 3 at the end of this document). These containers should not be placed at the extreme edges of the spread pattern, but in the center and placed equally to approximately 70% of the total spread pattern. Placing containers at the extreme edge of the spread pattern will provide a lower calculated application rate than the actual rate applied. Be sure to place the containers out of the path of the spreader tires, and also make sure that the container is low enough to pass under the manure spreader without damage.
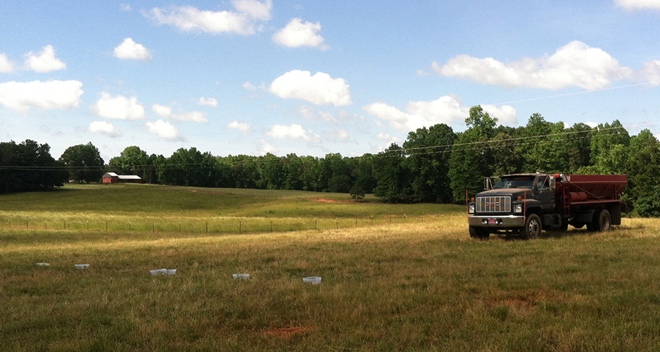
Figure 3. Plastic containers placed in front of the solid manure spreader truck before the spreading run. Image credit: Cassie LeMaster, Clemson University.
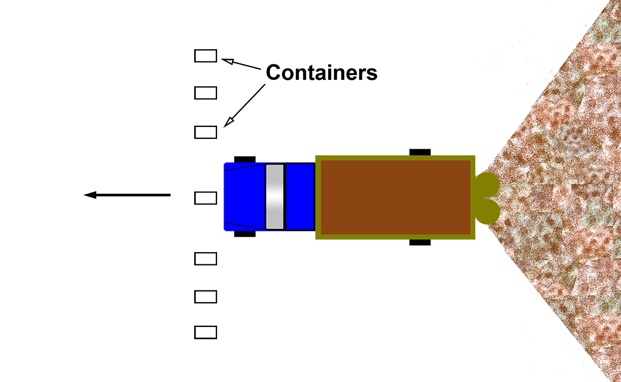
Figure 4. A typical container layout for a single pass calibration run. Image credit: W. Bryan Smith, Clemson University.
Step 4. Select a Speed
Select a gear and engine speed to be used during the calibration. These settings should be the same ones used during the normal spreading operation. Also select the floor chain speed setting and gate setting. Mark these settings down for reference.
Step 5. Apply Manure
Start the manure spreader thirty-five to forty feet from the containers to allow it to reach the speed desired and a normal spreading pattern. Drive the spreader over the containers, continuing past until the manure from the spreader is no longer reaching the containers (thirty to forty feet past the containers is recommended).
Step 6. Weigh the Containers
Collect the containers. Weigh the containers with the collected manure in them. If the weight of all of the containers exceeds the capacity of the scale, weigh two or three groups of containers, then add the weights together to obtain the total weight of the containers and manure. If the weight is provided in pounds and ounces by the scale, divide the ounces by 16 to get a decimal number.
Example: The total weight of seven containers with manure was 6 pounds, 3.2 ounces. Divide 3.2 ounces by 16 to get (3.2 / 16 =) 0.2 pounds, so the total weight with manure is 6.2 pounds.
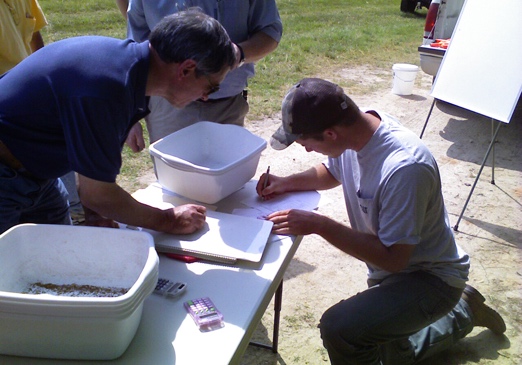
Figure 5. Calculations are one of the most critical parts of this process. Image credit: W. Bryan Smith, Clemson University.
Step 7. Find the Manure Weight
Subtract the weight found in step 6 from the weight found in step 1 to find the weight of the collected manure. Record this number (figure 5).
Example: 6.2 pounds – 5.3 pounds = 0.9 pounds of manure collected.
Step 8. Measure the Containers
Measure the inside length and inside width of the top of one of the containers, in inches, using the tape measure. Multiply these two numbers together to get the open area (in square inches) of the container. Multiply this number by the number of containers to get the total square inches of manure collection area. Record that number.
Example: Each container measured 6 in. x 12 in. inside wall to inside wall. 6 x 12 = 72 square inches per container; 72 square inches x 7 containers = 504 square inches.
Step 9. Calculate Square Feet
Divide the number found in step 8 by 144 to get square feet. Record that number.
Example: 504 square inches / 144 = 3.5 square feet.
Step 10. Find Pounds per Square Foot
Divide the pounds found in step 7 by the square feet found in step 9. Record that number.
Example: 0.9 pounds of manure / 3.5 square feet = 0.257 pounds per square foot
Step 11. Find Pounds per Acre
Multiply the number found in step 10 by 43,560 to get pounds per acre. Record that number.
Example: 0.257 pounds per square foot x 43,560 = 11,194 pounds per acre.
Step 12. Find Tons per Acre
If desired, divide the number found in step 11 by 2,000 to obtain tons per acre.
Example: 11,194 pounds per acre / 2,000 = 5.60 tons per acre.
If the amount of manure applied per acre determined by this process is the amount desired, the spreader is calibrated and ready to spread the manure used in the calibration. If the amount is less than desired, the grower may decrease the spreader ground speed, increase the floor chain speed, increase the gate opening, or any combination of these to increase the application rate. Then steps 1-12 must be completed again.
If the amount of manure applied per acre determined by this process is more than desired, the grower may increase the spreader ground speed, decrease the floor chain speed, decrease the gate opening, or any combination of these to decrease the application rate. Then steps 1-12 must be completed again.
The spreader settings, including gate opening, floor chain speed, spreader gear, and spreader engine speed should be recorded for each calibration attempt. This will take five to perhaps ten minutes per pass, but the grower will create several combinations in this time that may be kept on file to provide starting points for several different application rates.
Some manure spreaders allow adjustment of the spread pattern by changing spinner speed, moving the spinners closer to or farther away from the manure gate, or adjusting the blade tips. If these adjustments are available, these settings should also be carefully recorded, with the resulting spread pattern width noted, for future use if needed.
It is highly recommended to make at least one more calibration run and calculate the application rate again when the manure spreader has been calibrated to the target application rate. This simple “double-check” will make sure the current settings will provide the desired application rate. This will remove the chance for errors due to circumstances, such as a momentary increase in spreader ground speed due to a bump on the calibration run or a temporary decrease in application rate due to a temporary “bridge” of manure blocking a portion of the gate.
Manure Spreader Calibration – The Sheet Method
A worksheet that may be used for the Sheet Method is included in the PDF download for this entire publication (see link at top of page) or a PDF download for the worksheet only is also available. The advantage of the sheet method is that one disposable plastic sheet of any size may be used, then thrown away. It also offers a larger manure capture area that should provide a more accurate result. The disadvantage of the sheet method is that if the calibration is done in a pasture or hayfield, the sheet may bulge up in the center due to the forage underneath and allow some of the collected manure to slide off during the procedure. Wind may also cause the sheet to move or flap during the procedure.
The sheet method uses the same steps as the container method and requires a plastic sheet, a tape measure, and a postal scale. The scale must be an accurate scale, such as a postal scale, since the collected manure must be weighed to the nearest tenth of a pound (or ounce) for an accurate measurement. An example calibration is included in the steps for better understanding.
Step 1. Weigh the Sheet
Cut a plastic sheet to the desired size (6 ft. x 4 ft. is a good size; a larger sheet will be more accurate, but any sheet sized 2 ft. x 3 ft. or larger should work) and weigh it with the postal scale prior to using. If the weight is provided in pounds and ounces by the scale, divide the ounces by 16 to get a decimal number. Record this weight.
Example: The sheet selected weighs 2 pounds, 9.6 ounces. Divide 9.6 ounces by 16 to get (9.6 / 16 =) 0.6 pounds, so the total weight is 2.6 pounds.
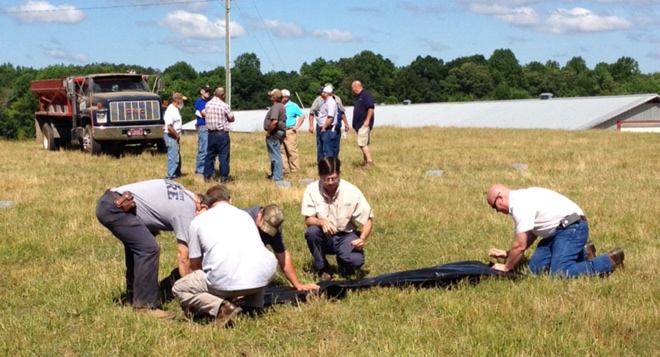
Figure 6. Placing the sheet before the spreader run. Tall forage and windy conditions can cause issues with the sheet method. Image credit: Cassie LeMaster, Clemson University.
Step 2. Place the Sheet
Place the sheet across the pathway of the planned track of the spreader (figure 6). This sheet should not be placed at the extreme edge of the spread pattern, but in or near the center. Tire travel across the sheet is allowable, but any mud or dirt deposited on the sheet by the tires will alter the calibration weight.
Step 3. Measure the Sheet
After placing the sheet on the ground, measure the length and width of the sheet with the tape measure. Multiply these two numbers together to get the open area (in square inches) of the sheet. Record that number.
Example: The sheet measured 72 inches by 48 inches. 72 inches x 48 inches = 3,456 square inches.
Step 4. Calculate Square Feet
Divide the number found in step 3 by 144 to get square feet. Record that number.
Example: 3,456 square inches / 144 = 24 square feet.
Step 5. Select a Speed
Select a gear and engine speed to be used during the calibration. These settings should be the same ones used during normal spreading operation. Also select the floor chain speed setting and gate setting. Mark these settings down for reference.
Step 6. Apply Manure
Start the manure spreader thirty-five to forty feet from the sheet to allow it to reach the speed desired and a normal spreading pattern. Drive the spreader over the sheet, continuing past until the manure from the spreader is no longer reaching the sheet (thirty to forty feet past the containers is recommended).
Step 7. Weigh the Sheet
Collect the sheet, carefully rolling or folding it inward to retain the manure. Weigh the sheet with the collected manure on it. If the weight is provided in pounds and ounces by the scale, divide the ounces by 16 to get a decimal number.
Example: The total weight of the sheet with manure was 6 pounds, 3.2 ounces. Divide 3.2 ounces by 16 to get (3.2 / 16 =) 0.2 pounds, so the total weight with manure is 6.2 pounds.
Step 8. Find the Manure Weight
Subtract the weight found in step 7 from the weight found in step 1 to find the weight of the collected manure. Record this number.
Example: 6.2 pounds – 2.6 pounds = 3.6 pounds of manure collected.
Step 9. Find Pounds per Square Foot
Divide the pounds found in step 8 by the square feet found in step 4. Record that number.
Example: 3.6 pounds of manure / 24 square feet = 0.15 pounds per square foot
Step 10. Find Pounds per Acre
Multiply the number found in step 9 by 43,560 to get pounds per acre. Record that number.
Example: 0.15 pounds per square foot x 43,560 = 6,534 pounds per acre.
Step 11. Find Tons per Acre
If desired, divide the number found in step 10 by 2,000 to obtain tons per acre.
Example: 6,534 pounds per acre / 2,000 = 3.27 tons per acre.
If the amount of manure applied per acre determined by this process is the amount desired, the spreader is calibrated and ready to spread the manure used in the calibration. If the amount is less than desired, the grower may decrease the spreader ground speed, increase the floor chain speed, increase the gate opening, or any combination of these to increase the application rate. Then steps 1-11 must be completed again.
If the amount of manure applied per acre determined by this process is more than desired, the grower may increase the spreader ground speed, decrease the floor chain speed, decrease the gate opening, or any combination of these to decrease the application rate. Then steps 1-11 must be completed again.
The spreader settings, including gate opening, floor chain speed, spreader gear, and spreader engine speed should be recorded for each calibration attempt. This will take five to perhaps ten minutes per pass, but the grower will create several combinations in this time that may be kept on file to provide starting points for several different application rates.
Some manure spreaders allow adjustment of the spread pattern by changing spinner speed, moving the spinners closer to or farther away from the manure gate, or adjusting the blade tips. If these adjustments are available, these settings should also be carefully recorded, with the resulting spread pattern width noted, for future use if needed.
It is highly recommended to make at least one more calibration run and calculate the application rate again when the manure spreader has been calibrated to the target application rate. This simple “double-check” will make sure the current settings will provide the desired application rate. This will remove the chance for errors due to circumstances, such as a momentary increase in spreader ground speed due to a bump on the calibration run or a temporary decrease in application rate due to a temporary “bridge” of manure blocking a portion of the gate.
Notes
- The amount of manure applied per acre will vary with the moisture content and type of manure. A spreader calibrated for a low moisture content poultry litter will apply a different rate of a high moisture content litter if the settings are not adjusted. A spreader calibrated to apply scraped dairy manure solids will also apply a different rate of poultry manure at the same settings. Spreader calibration should be done for each type of manure to be spread, and also if the moisture content varies significantly between different sources of the same type manure.
- South Carolina Regulation R.61-43 requires manure spreaders to be calibrated at least once each year.2 The calibration from year to year may not change much if the moisture content in the manure is the same and the same type of manure is spread, but normal wear on the spreader equipment will cause application rate changes over several years. Spreader calibration may also help detect mechanical issues that can cause non-uniform spreading. Calibrate each year to best utilize the manure to be spread.
- The containers or the sheet may be placed between two passes of the spreader if desired, rather than directly in the path of the spreader (figures 7 and 8). If this is done, the spreader must be driven with normal spacing between runs that will be used during manure application. Both passes should be made in the same direction, so manure spread from the left side and the right side of the spreader is captured since some spreaders apply manure more heavily to one side than the other. Making two “dry runs” with the spreader may help the grower determine where to place the containers or sheet before actually applying manure. The operator may then follow the previous sets of tire tracks during calibration.
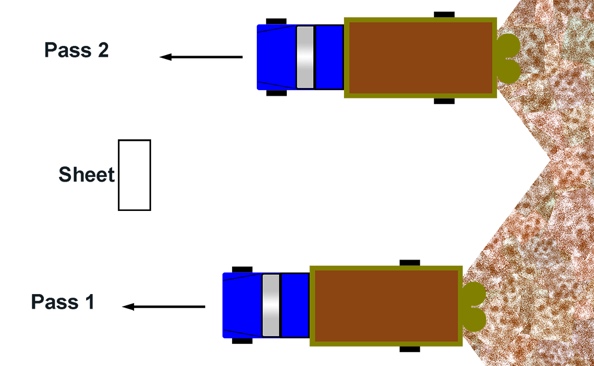
Figures 7 and 8. Placing the sheet or containers between spreader runs is another option and may be the best option for the sheet method to prevent soil deposits on the sheet by the tires. It should also provide more accurate results. Image credit: W. Bryan Smith, Clemson University.

Figure 8. Image credit: W. Bryan Smith, Clemson University.
Contact Information
Clemson University Agricultural Service Laboratory
171 Old Cherry Road
Clemson, SC 29634
864-656-2068
agsrvlb@clemson.edu
https://www.clemson.edu/public/regulatory/ag-srvc-lab/index.html
Clemson Extension Offices accept manure and soil samples to send to the Agricultural Service Laboratory. There is a Clemson Extension Office in every county in South Carolina.
References Cited
- South Carolina Confined Animal Manure Managers Program. Clemson (SC): Clemson University Cooperative Extension Service; c2019 [accessed 2019 August]. http://www.clemson.edu/camm.
- S.C. Department of Health and Environmental Control. Water regulations and standards: Standards for the permitting of agricultural animal facilities. Columbia (SC): DHEC; [accessed 2019 August]. https://www.scdhec.gov/environment/water-quality/water-regulations-standards/water-regulations-standards-standards.
