

Planting strawberries requires a degree of attention and skill to ensure that transplants are set at the correct depth and that their roots are not folded or bunched in the planting holes. This article describes how to construct and use a simple, cost-effective planting tool that makes proper planting easier for workers. Plans for constructing the tools are included, along with links to English and Spanish-language training videos.
Introduction
Each fall, strawberries are planted across the Southeast to be harvested in the spring. Like any crop, properly planting strawberry transplants is vital to their success. While plug plants are relatively easy to transplant, fresh-dug bare-root transplants require more attention to detail. Common planting errors, such as planting too deep, J-rooting (folding of the roots), and bunching the roots, lead to poor establishment, stunting, or plant death (Figures 1 and 2).
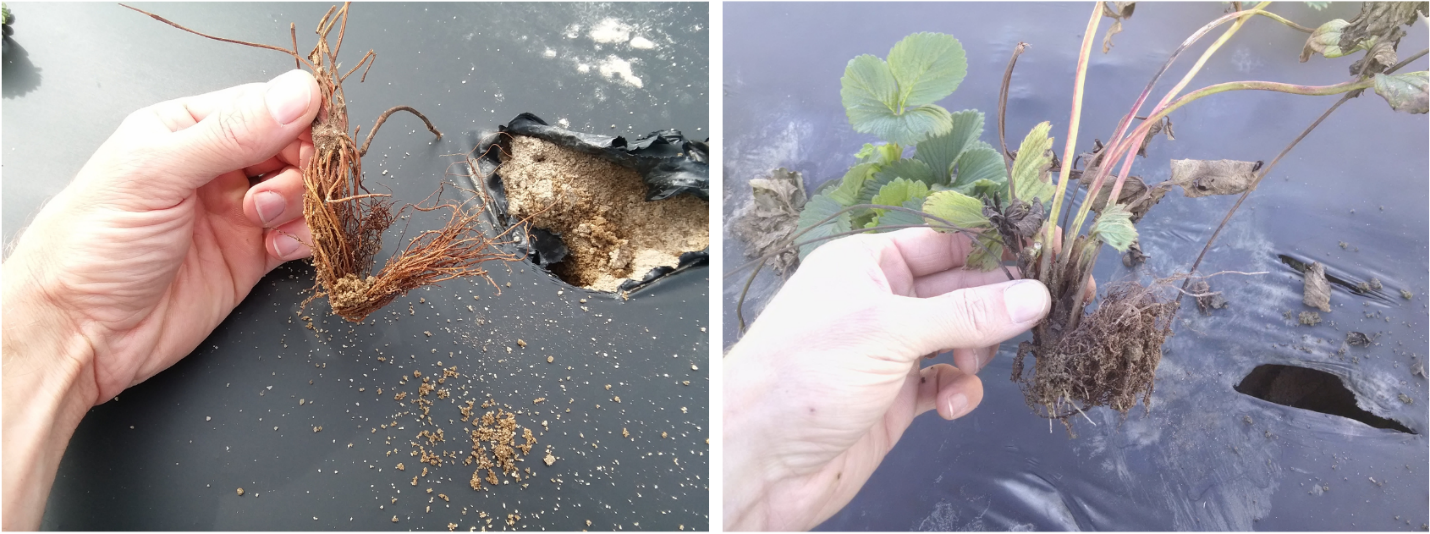
Figure 1. J-rooting (left) and bunching (right) the roots of strawberry transplants are common planting errors that can stunt or kill plants and greatly affect yield. Image Credit: Justin Ballew, Clemson Extension.
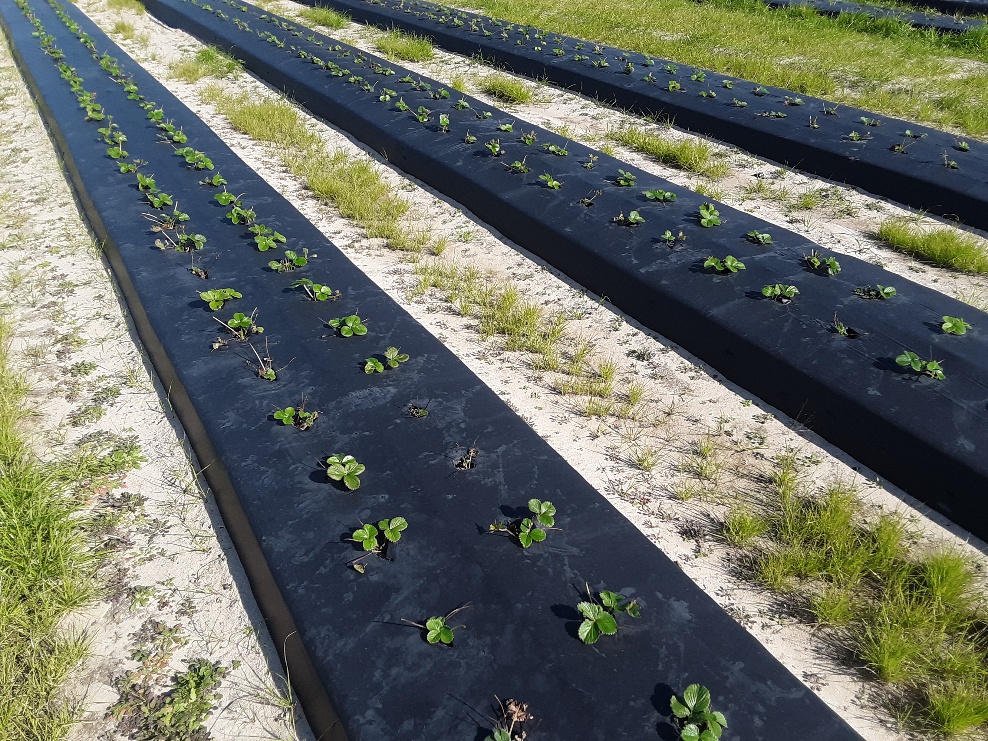
Figure 2. Strawberry transplants that did not survive establishment due to J-rooting. Image Credit: Justin Ballew, Clemson Extension.
Strawberry planting tools are simple-to-make and user-friendly tools that allow for fast and efficient planting (Figure 3). When used properly, they allow workers to quickly set plants at the correct depth while straightening the roots in the plant hole. J-rooting will still occur if the tools are not used properly.
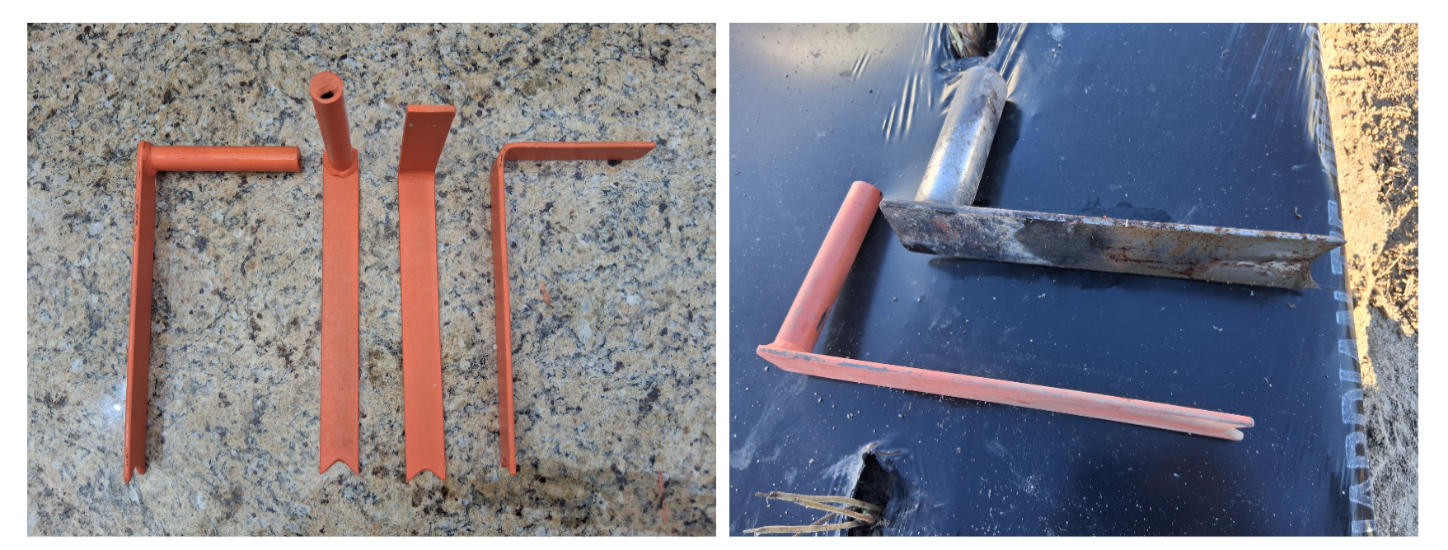
Figure 3. Strawberry planting tools can vary in size and construction. Just ensure they fit comfortably in the hand and are long enough to set plants at the correct depth and straighten the roots. Image credit: Justin Ballew, Clemson Extension.
Growers should train planting crews on the proper planting tool technique and teach them to recognize the correct plant depth before planting begins (Figure 4).1 In addition, crew leaders must be trained to monitor workers continuously, ensuring proper techniques are used and providing corrections when necessary.
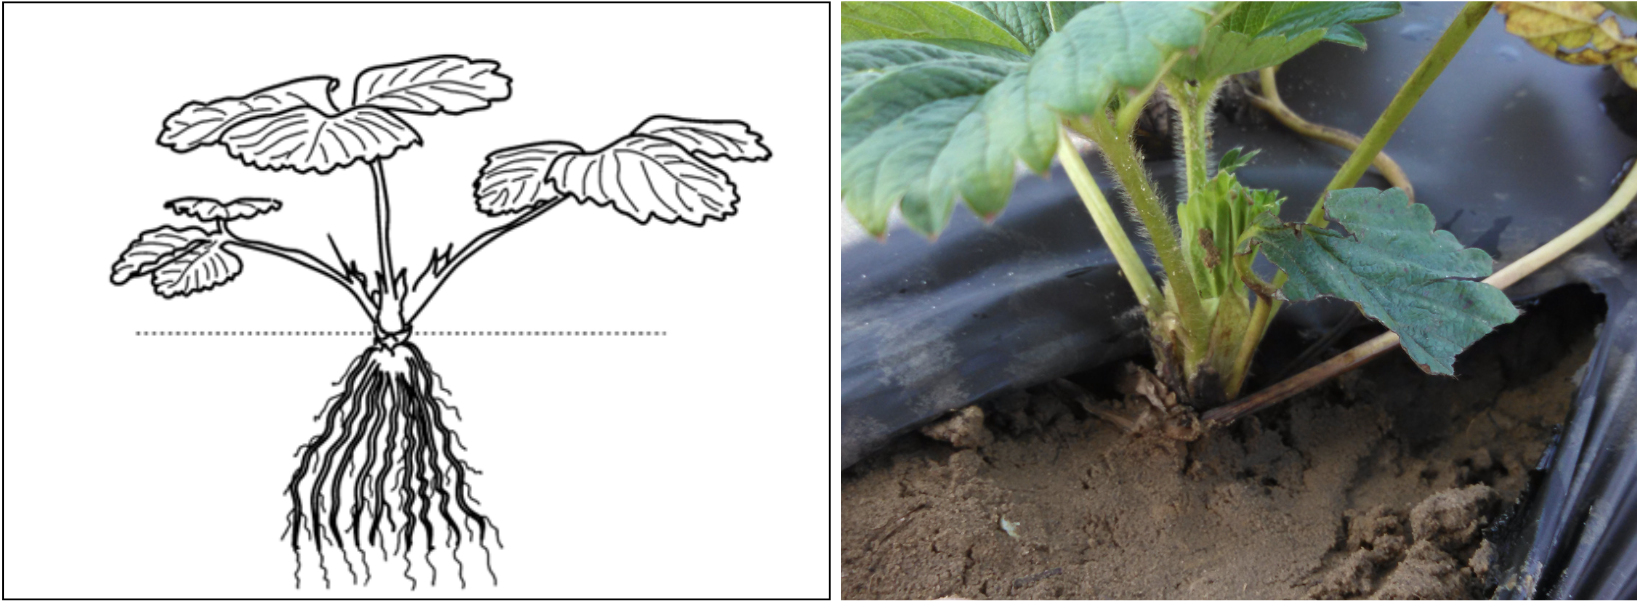
Figure 4. The correct planting depth of a strawberry transplant. The crown should be just above the soil surface. Image credit: Poling, et. al., NC State University (Left) Justin Ballew, Clemson Extension (Right)
Constructing Planting Tools
Strawberry planting tools have a simple design and can be constructed in most farm shops from a variety of materials (Figure 3). The suggested materials described below are available in most hardware stores.
If constructed as described below, the cost of materials for each tool is around $7-8 (prices as of 2025) (Figure 5).2 It is acceptable for dimensions to vary slightly from the plans due to the use of scrap materials in construction. Just ensure the tool fits comfortably in the hand and is long enough to set plants at the correct depth and straighten their roots.
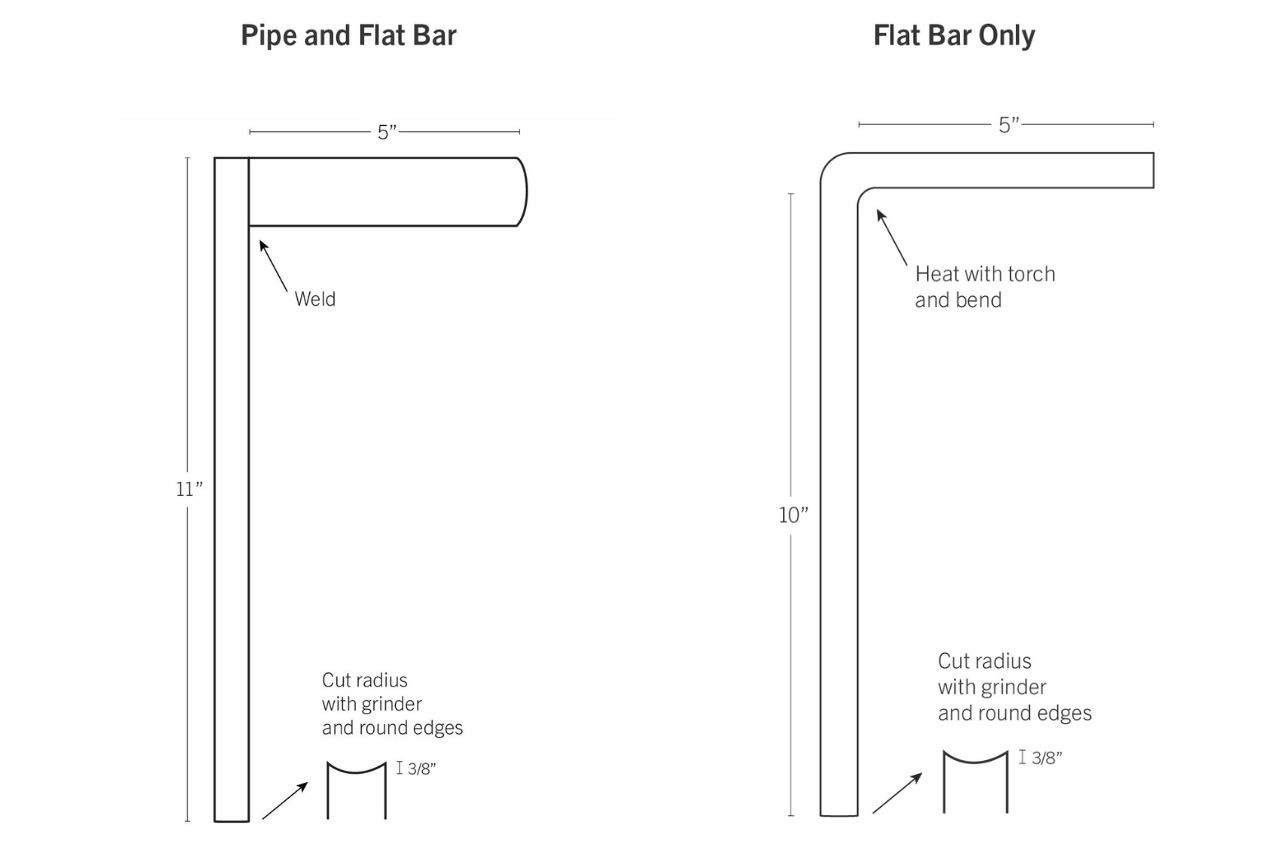
Figure 5. Two options for constructing strawberry planting tools. Image Credit: Tina LeMay, Clemson University
Pipe and Flat Bar Variation (Figure 5, left)
Materials needed: 1 1/4” x 3/16” flat bar, 1/2” pipe (7/8” OD)
Tools Needed: Welder, bench or angle grinder, wire wheel (optional)
Instructions:
- Cut the flat bar to approximately 11 inches in length and the pipe to 5 inches in length.
- Using a grinder or wire wheel, thoroughly clean the areas to be welded.
- Weld one end of the pipe to the flat bar at a 90 ° angle, as shown in the plan.
- Using a grinder, make a semi-circular-shaped cutout approximately 3/8 inch deep at the opposite end of the flat bar, as shown in the plan.
- Using the grinder, round the edges of the cutout and any other sharp edges on the tool.
Flat Bar Only Variation (Figure 5, right)
Materials needed: 1 1/4” x 3/16” flat bar
Tools Needed: Acetylene torch, bench or angle grinder, vise or anvil, hammer
Instructions:
- Cut the flat bar to approximately 15 inches in length.
- Make a mark approximately 5 inches from one end of the flat bar.
- At the mark, heat the flat bar with a torch until hot enough to bend.
- Using an anvil or vise and a hammer, bend the flat bar 90 ° at the mark, as shown in the plan.
- Using a grinder, make a semi-circular shaped cutout approximately 3/8 inch deep at the opposite end of the flat bar, as shown in the plan.
- Using the grinder, round the edges of the cutout and any other sharp edges on the tool.
Using the Planting Tool
The planting tool is suitable for fresh-dug bare-root transplants, including cutoffs. It is not intended for use when planting plugs. Follow the procedure below to set plants at the appropriate depth and avoid J-rooting (Figure 6).3
- While positioning a transplant over a planting hole, place the cutout end of the tool near the bottom of the roots.
- Using the tool, push the roots down into the hole until the crown is just above the soil surface (Figure 4).
- While holding the crown with one hand to keep it from going any deeper, gently push the tool all the way down until the handle touches the plastic. (This step is critical as it ensures the roots are straightened in the hole.)
- While still holding the crown with one hand, gently pull the tool straight up and out of the hole.
- Firm the soil around the transplant.
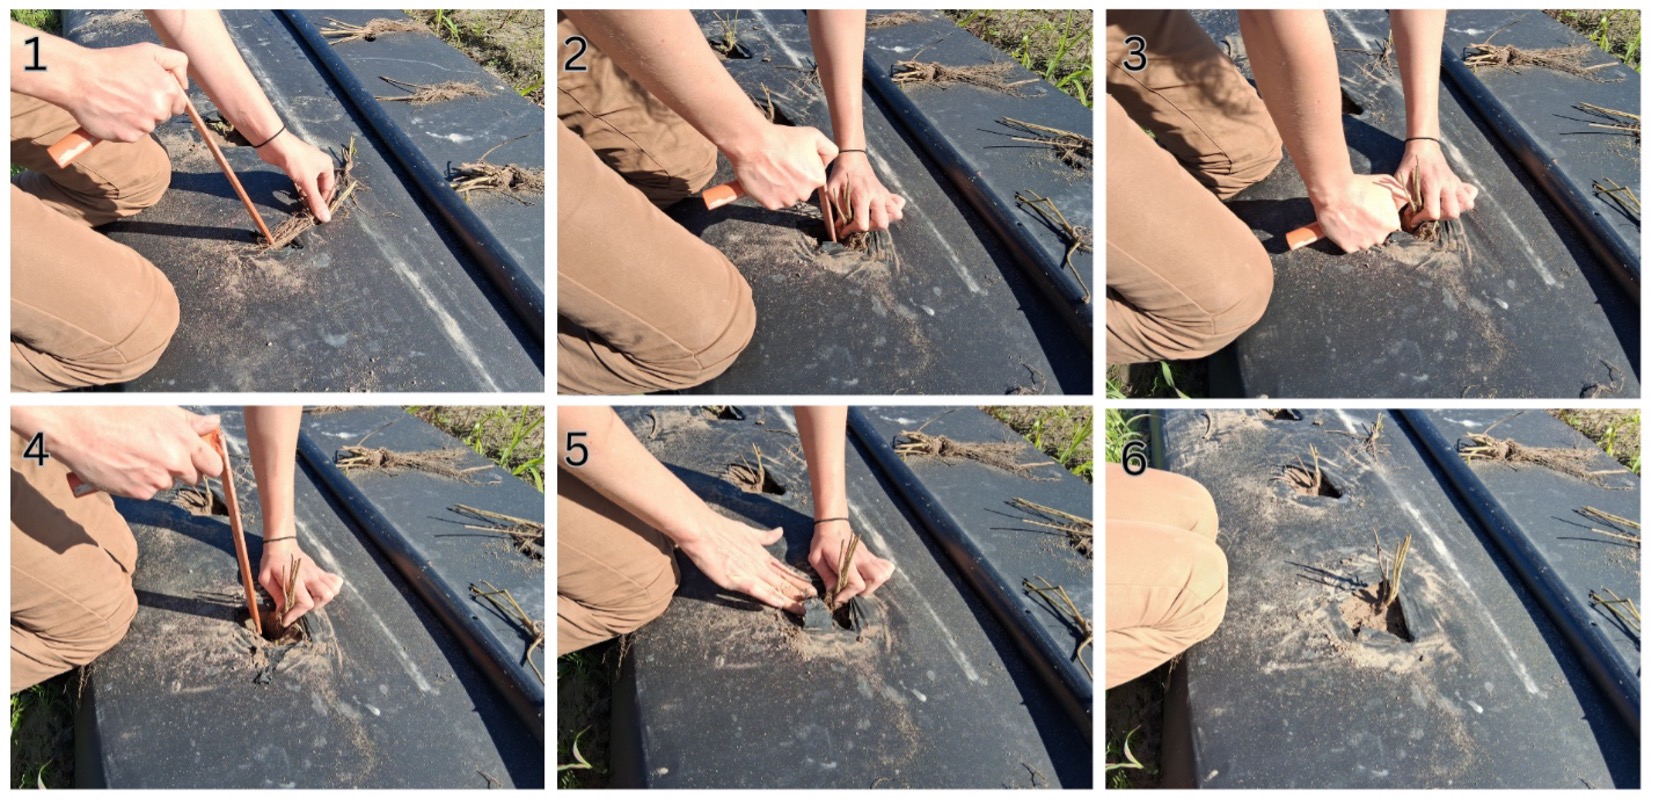
Figure 6. (1) Place the planting tool near the end of the roots. (2) Push the roots down into the hole to the proper depth. (3) Hold the plant while pushing the tool all the way down to the plastic. (4) Gently pull the planting tool up and out of the hole. (5) Firm the soil around the plant. (6) The transplant is set correctly. Image credit: Justin Ballew, Clemson Extension.
Training videos demonstrating this procedure are available in both English and Spanish and can be used to train planting crews. See the Additional Resources section at the end of this publication.
References Cited
- 1. Poling, E. B., Navey-Davis, S., & Miller, G. E. (2019). Planting fresh dug, bare-root strawberries by hand. In A grower’s guide to production, economics and marketing (pp. 177–178).
- 2. Poling, E. B. (2003, September 20). Setting fresh dug, bare-root strawberry plants with a hand tool. North Carolina Cooperative Extension Service. https://smallfruits.org/files/2019/06/strbry_Settingplantswithahandtool.pdf
- 3. Poling, B. (2021, May 20). Planting. NC State Extension. https://strawberries.ces.ncsu.edu/strawberries-production-planting/
Additional Resources
- Clemson University. 2025. Using a Strawberry Planting Tool (English) [Video]. YouTube. [Accessed Dec 11, 2025]. https://www.youtube.com/watch?v=JZ1AsFbL5XM
- Clemson University. 2025. Using a Strawberry Planting Tool (Spanish) [Video]. YouTube. [Accessed Dec 11, 2025]. https://www.youtube.com/watch?v=srPnnqVxJMU